Tuesday, May 11, 2010

Extras

I found a box of peel and stick tiles in the garage that had no future use, so I put them on the floor of the TD. This is purely cosmetic and the only place they'll be visable will be the floor of the galley. I just like the finished look of it and the price was right.


I also wired the walls for my porch lights while the inner skins hadn't been applied yet. I'll run the wires to the connections in between the roof panels and they're held in place with some aluminum duct tape I had available.


Sunday, May 9, 2010

Profile and Outer Skin

The profile was pretty straight forward. I took it right from the Generic Benroy plans from Teardrops & Tiny Trailers . I chose to make a template from 1/8 Hardboard ($8-Lowe's) of the profile. This allowed me to play around with the profile to my liking and I also only had to do the different radius's one time on one sheet. I then cut out the profile and used this as a template for the "real" outer walls.


The silvertape is where I had broken the Hardboard to fit in the Jeep...some ductape was all it took to piece it back together.

I then laid the template on the plywood that I chose for my outer skin, 3/8" ACX Spruce and traced the profile as well as marked the locations for the cabinets. I traced the profile on both sides of the ply and then laid it good sign down and then set about working on the framing for the walls. My wall's are "sandwich" construction meaning an outer skin (3/8 ply), then a layer of 1x2 framing, and then the inner skin (1/8 luan) all glued together as a solid, modular wall panel. In between the 1x2 framing will be polystyrene insulation, which is the silver-backed insulation you see on the outside of houses. Mine is 3/4" thick which compensates perfectly with the 1x2 (actual thickness 3/4"). The pics also show me using some 1x4 in areas that I thought I'd want beefier (door openings, etc) hindsight says that this is overkill.


I let the framing dry for a day and then I glued the EPS into the voids. I then cut out the profiles with a jig saw with a new laminate cutting blade. A laminate cutting bit only cuts on the down stroke and I cut it from the good side of the plywood. Buy the BEST laminate blade you can find (Bosch, $7-Lowes) and take your time. I then clamped both walls together, set them vertically, and sanded them both at the same time as one unit. This made them mirror images of one-another. Most people use a belt sander for this step but a belt sander can take allot of meat if you leave it in one place too long. I used a power planer with the depth set at 1/16 at a time.


I couldn't resist putting the walls up on the trailer and having a look.


Friday, April 30, 2010

Frame and Floor

Here's the trailer with new paint:


I like this allot more than the bright red, but to each his own I guess. The fenders come black and now the frame matches. Also the photo above doesn't show the pressure treated 2x4 spanning the center width. I notched it to fit and inserted lag bolts in the end. This will also allow me to simply drive deck screws into the center once the floor is on.


Here's some shot's of the floor:
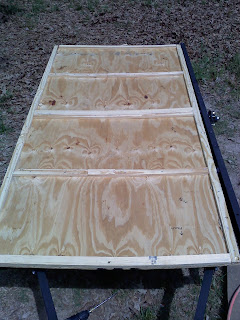

You're looking at the underside of the floor. The floor was constructed with 1/2 inch plywood on a 1x2 frame. The wooden frame spacing was identical to that of the trailer so it could simply be bolted to the trailer frame with 3/8 bolts and the 1x2's were attached with Titebond III and wood screws. Wood screws were overkill and I would use brads next time.
Here's a shot of the floor covered in roof coating:


...and here the EPS is installed in the floor:


I let the roof coating dry for several days before attaching it to the frame with bolts and silicone sealant.


Sunday, April 18, 2010

Trailer Frame


I bought a pre-fab bolt together trailer from Harbor Freight. I'd been watching recently in anticipation of finding it on sale, and of course when it did go on sale, I was travelling. No worries, I found a 20% off coupon online and was able to snag the trailer for $240. It came in two boxes that actually fit in the back of my Jeep Liberty.


Unpacking yielded this:


Everything I'd need for a trailer except... instructions. A quick google'ing and I found the instructions that I needed and in a PDF, so a quick print out and I was good to go. Assembly was easy and I made the following modifications:


  1. This was a "foldable" trailer and I did not install the hinges.

  2. I took two frame crossbars, cut 3" from each and placed this inside the left frame rail and the right frame rail where the hinges would of been placed, linking the front half and the rear half of the trailer. Thus making it a non-foldable trailer. I inserted a pressure treated 2x4 right in the center of the trailer replacing one of the crossbars that I'd removed.

  3. I moved the wheelbase back 5" and in doing so cut the caster support off of the spring mounts.

  4. I left the axle as a "spring-over" as I want the extra travel. Some builders place the axle underneath the spring to bring the ride height down.

  5. I repainted the trailer flat black.


Beginnings

All of this project was made possible by the many members and teardrop guru's that frequent the Teardrop & Tiny Travel Trailers (T&TTT) site. I owe all that I know of Teardrop Trailers to them and the wealth of information that that site provides. I'd recommend you start there if you're interested or want to learn a little more about Teardrops.

The plan that I'm following is available FREE on the T&TTT site. I'll add my own tweeks and ideas to it as I go along but for the most part the design and the how-to are right there for anyone to access and use. I put several months of planning into this build. I paid attention to the questions that were asked on the forum and have paid attention to other peoples mistakes and other peoples break-throughs.

A little about me: I'm in my mid-thirties and I'm the outtdoor type to a "t." Most of my life has been spent on ski's and a bicycle. I have a two year old daughter that is already showing a keen interest in the outdoors and I see this Tear as a way to strengthen her interest. This Tear will be used alot...I mean thousands of miles a year. It will provide me a place to sleep while ski-bumming, while attending various cycling events around the country, and be perfect for the daughter and I to "rough it" for a week or two. As I go through this, please feel free to add any comments or shoot me an email with any questions that you have.

Thanks for reading- Brent